
Renaming Pages and Files
Learn to proper rename pages and files.
A Rose by Any Other Name: Keeping things Straight When Renaming Pages and Files
Shakespeare wasn't wrong. A rose by any other name would smell as sweet. But when it comes to page and file names in Cascade a name means everything.
- When you rename a page or an asset in Cascade the URL can change along with it. When this happens we run a few risks that can lead to a 404 Page Not Found, error message.
Here's a couple scenarios in which a new URL can lead users to a 404 error:
- The old URL is printed in marketing materials
- A user has bookmark the old URL of the page
- Google takes its time registering a new link in place of the old
No matter what, each of these scenarios leads to the same problem—a user can't find what they're looking for. When that happens, they'll either go someplace else to find that info or give up entirely.
- Pro tip: When renaming pages on Cascade, there are four items to rename so that nothing gets too confusing: the title of the page itself, the name of the file in the asset tree, the name of the folder that holds the file in the asset tree, and the URL itself.
How to rename pages and files
When renaming pages and files, it's best to move slowly and pay close attention t what's happening. If you're working under pressure or aren't paying attention, you may end doing things incorrectly and having to start over.
For our purposes here, we'll start in the backend and move our way to the user on the frontend.
Here's the step-by-step:
- Right click on the folder you want to rename in the asset tree. When you do this a small window will pop up. Scroll down and select rename.

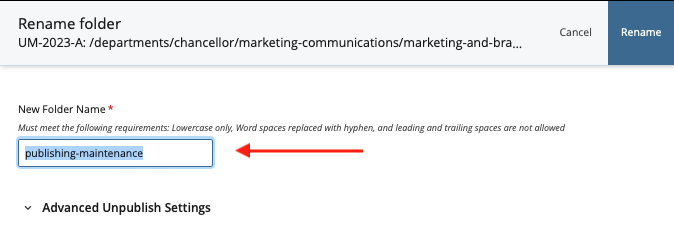
- Once you've clicked on "Rename," another window will pop up named "Rename folder," this is where you'll rename the URL of the page. Whatever name you choose, make sure that you use that name on every subsequent item you rename.
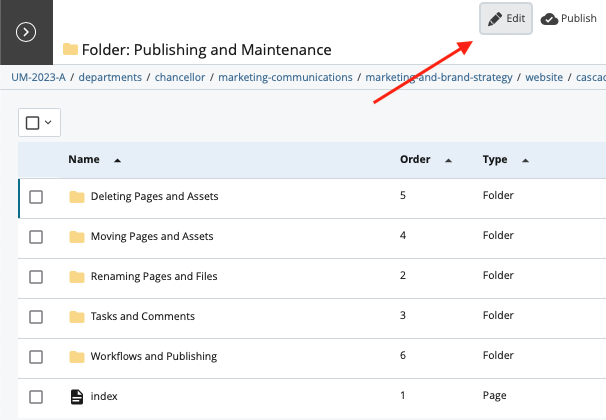
- Once you've renamed the URL, you'll need to rename the folder itself. Click on the folder and then select the "Edit" button at the top right of the screen.
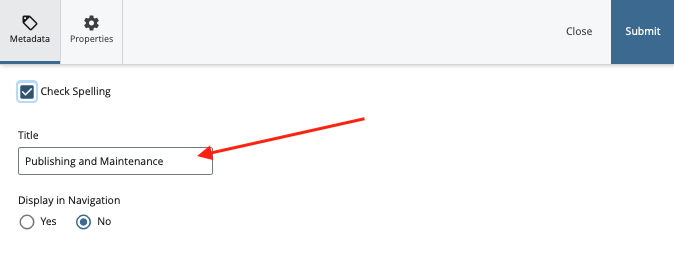
- Once you select the "Edit" button a new window will appear that will ask you to rename the folder. Once you've typed in a new name, select "Submit" and you'll find that the folder name has changed.
- From here, you still need to make sure that the page itself gets a new title (to reflect all the changes you've just made). To do this, find the page inside the proper folder and open the page, then select the "Edit" button at the top right of the page.
When you're inside the edit window of the page there are two last fields that you have to change. The title of the page in the asset tree (at the top of the page under "Title") and the Header of the page that the user will see (under "Basic Hero Title").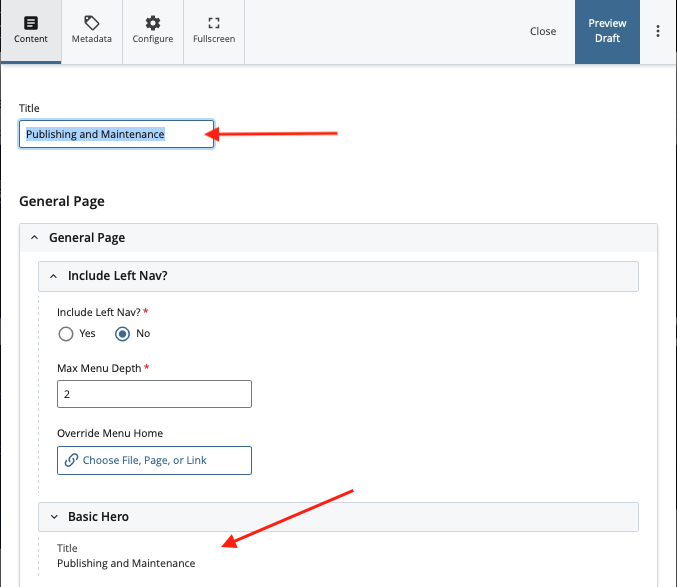
Remember, just because you've change the name of your page, doesn't mean that your work is done. If there are iterations of the old URL out in the world, you may want to chase them down so that users don't wind up with a dread 404 on their hands.
Still Need Help?
Whether you're working in Cascade, MyEmma, or the Event Calendar, the Web Content team is here to help you get your message out there.